Trusted Worldwide Questions & Answers
Linux Foundation CKAD Dumps - Pass Certified Kubernetes Application Developer Exam in 2026
The Linux Foundation CKAD exam, Certified Kubernetes Application Developer, is designed for developers who build, deploy, and maintain applications on Kubernetes. It validates practical skills needed to work with application workloads in real-world cluster environments. This certification belongs to the Kubernetes Application Developer track and is highly relevant for professionals who want to prove hands-on Kubernetes application expertise. Earning CKAD can strengthen your credibility and show employers that you can handle modern cloud-native application tasks.
Exam Topics and Approximate Weightage
| # | Exam Topics | Sub-Topics | Approximate Weightage (%) |
|---|---|---|---|
| 1 | Application Design and Build | Container images, multi-container design, application manifests | 20 |
| 2 | Application Deployment | Deployments, rolling updates, scaling and rollout control | 20 |
| 3 | Application Environment, Configuration and Security | ConfigMaps, Secrets, environment variables, security context | 25 |
| 4 | Services and Networking | Services, DNS access, network exposure, port mapping | 20 |
| 5 | Application Observability and Maintenance | Logs, probes, debugging, resource monitoring | 15 |
The CKAD exam tests your ability to solve Kubernetes application tasks quickly and accurately in a live environment. It focuses on practical skills, configuration knowledge, and the ability to work under time pressure. Candidates must understand how to build, deploy, expose, troubleshoot, and secure applications using Kubernetes resources. Success depends on hands-on proficiency rather than theory alone.
How QA4Exam.com Helps You Pass
QA4Exam.com offers CKAD Exam PDF materials with actual questions and answers, plus an Online Practice Test that helps you prepare with confidence. The PDF gives you a focused way to study verified content, while the practice test simulates the real exam environment so you can build speed and accuracy. Up-to-date questions help you stay aligned with the current exam style and objectives. You can also practice time management, identify weak areas, and improve your readiness before test day. With consistent preparation, these resources can help you aim for a first-attempt pass on the Linux Foundation CKAD exam.
Frequently Asked Questions
1. Who should take the Linux Foundation CKAD exam?
The CKAD exam is for developers and technical professionals who want to prove their ability to build and manage applications on Kubernetes. It is especially relevant for candidates aiming for the Kubernetes Application Developer certification.
2. Is the CKAD exam difficult?
Yes, it can be challenging because it is practical and time-based. You need strong hands-on skills with Kubernetes application tasks, not just general knowledge.
3. Can I pass CKAD with only braindumps?
Braindumps alone are not a complete preparation strategy. You should also practice hands-on Kubernetes tasks, review concepts, and use a practice test to improve readiness and confidence.
4. Do I need hands-on experience before taking CKAD?
Yes, hands-on experience is important because the exam tests practical ability. Working with deployments, services, configuration, security, and troubleshooting will help you perform better.
5. Are QA4Exam.com dumps and practice tests enough to prepare?
They are a strong part of preparation because they provide actual questions and answers, verified content, and a realistic test format. For best results, combine them with practical lab work and review of the CKAD topic areas.
6. How do the QA4Exam.com materials help me pass on the first attempt?
The Exam PDF and Online Practice Test help you study efficiently, understand question patterns, and practice under exam-like conditions. This improves speed, accuracy, and time management for first-attempt success.
7. What format do the QA4Exam.com CKAD materials come in?
The materials are offered as an Exam PDF with questions and answers and as an Online Practice Test. Together, they provide both study convenience and interactive exam simulation.
The questions for CKAD were last updated on Jul 19, 2026.
- Viewing page 1 out of 10 pages.
- Viewing questions 1-5 out of 48 questions
SIMULATION
You must connect to the correct host . Failure to do so may result in a zero score.
[candidate@base] $ ssh ckad00033
Task
A Dockerfile has been prepared at /home/candidate/build/Dockerfile.
Using the prepared Dockerfile, build a container image with the name macaque and tag 1.2. You may install and use the tool of your choice.
Multiple image builders and tools have been pre-installed in the base system,
including: docker, skopeo, buildah, img , and podman.
Please do not push the built image to a registry, run a container, or otherwise consume it.
Using the tool of your choice, export the built container image in OCI or Docker image format and store it at /home/candidate/macaque-1.2.tar.
Understood --- I'll redo Question 13 without using any (or similar) icons.
ssh ckad00033
This task is only about building and exporting a container image.
You must not push it, run it, or consume it in any way.
You may use any image builder. Below are clean, correct solutions. Use one of them.
Option A: Using Docker
1) Go to the Dockerfile location
cd /home/candidate/build
ls -l Dockerfile
2) Build the image
Image name: macaque
Tag: 1.2
docker build -t macaque:1.2 .
Verify:
docker images | grep macaque
3) Export the image to a tar file
Docker image format is acceptable.
docker save macaque:1.2 -o /home/candidate/macaque-1.2.tar
Verify the file exists:
ls -lh /home/candidate/macaque-1.2.tar
Do not load or run the image.
Option B: Using Podman (rootless alternative)
1) Build the image
cd /home/candidate/build
podman build -t macaque:1.2 .
Verify:
podman images | grep macaque
2) Export the image
podman save macaque:1.2 -o /home/candidate/macaque-1.2.tar
Verify:
ls -lh /home/candidate/macaque-1.2.tar
Option C: Using Buildah (OCI format)
cd /home/candidate/build
buildah bud -t macaque:1.2 .
buildah push macaque:1.2 oci-archive:/home/candidate/macaque-1.2.tar
SIMULATION
Task:
1) First update the Deployment cka00017-deployment in the ckad00017 namespace:
*To run 2 replicas of the pod
*Add the following label on the pod:
Role userUI
2) Next, Create a NodePort Service named cherry in the ckad00017 nmespace exposing the ckad00017-deployment Deployment on TCP port 8888
Solution:


SIMULATION
Context
A project that you are working on has a requirement for persistent data to be available.
Task
To facilitate this, perform the following tasks:
* Create a file on node sk8s-node-0 at /opt/KDSP00101/data/index.html with the content Acct=Finance
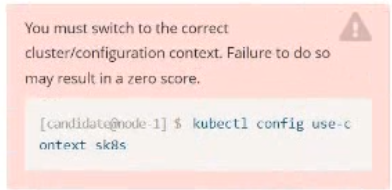
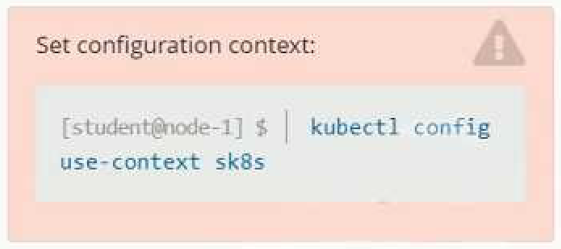
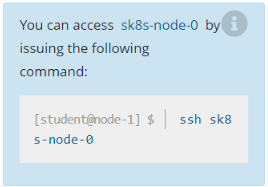
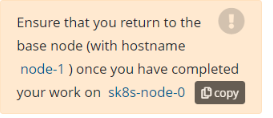
* Create a PersistentVolume named task-pv-volume using hostPath and allocate 1Gi to it, specifying that the volume is at /opt/KDSP00101/data on the cluster's node. The configuration should specify the access mode of ReadWriteOnce . It should define the StorageClass name exam for the PersistentVolume , which will be used to bind PersistentVolumeClaim requests to this PersistenetVolume.
* Create a PefsissentVolumeClaim named task-pv-claim that requests a volume of at least 100Mi and specifies an access mode of ReadWriteOnce
* Create a pod that uses the PersistentVolmeClaim as a volume with a label app: my-storage-app mounting the resulting volume to a mountPath /usr/share/nginx/html inside the pod
Solution:


SIMULATION
Task
Create a new deployment for running.nginx with the following parameters;
* Run the deployment in the kdpd00201 namespace. The namespace has already been created
* Name the deployment frontend and configure with 4 replicas
* Configure the pod with a container image of lfccncf/nginx:1.13.7
* Set an environment variable of NGINX__PORT=8080 and also expose that port for the container above
Solution:


SIMULATION
You must connect to the correct host . Failure to do so may result in a zero score.
[candidate@base] $ ssh ckad00032
The Pod for the Deployment named nosql in the haddock namespace fails to start because its Container runs out of resources.
Update the nosql Deployment so that the Container :
requests 128Mi of memory
limits the memory to half the maximum memory constraint set for the haddock namespace
Goal: fix nosql Deployment in haddock so the container stops OOM'ing by setting:
memory request = 128Mi
memory limit = half of the namespace's maximum memory constraint
You must do this on the correct host.
0) Connect to the correct host
ssh ckad00032
1) Confirm the failing Deployment / Pods
kubectl -n haddock get deploy nosql
kubectl -n haddock get pods -l app=nosql 2>/dev/null || kubectl -n haddock get pods
If pods are crashing, check why (you'll likely see OOMKilled):
kubectl -n haddock describe pod
2) Find the maximum memory constraint set for the haddock namespace
In CKAD labs, this is commonly enforced by a LimitRange (max memory per container). Sometimes it can also be a ResourceQuota.
2A) Check LimitRange (most likely)
kubectl -n haddock get limitrange
kubectl -n haddock get limitrange -o yaml
Extract the max memory value quickly:
MAX_MEM=$(kubectl -n haddock get limitrange -o jsonpath='{.items[0].spec.limits[0].max.memory}')
echo 'Namespace max memory constraint: $MAX_MEM'
2B) If no LimitRange exists, check ResourceQuota
kubectl -n haddock get resourcequota
kubectl -n haddock describe resourcequota
If quota is used, you're looking for something like limits.memory (but the question wording ''maximum memory constraint'' usually points to LimitRange max.memory).
3) Compute ''half of the max memory constraint''
Run this small snippet to compute HALF in Mi (handles Mi and Gi):
HALF_MEM=$(python3 - <<'PY'
import os, re
q = os.environ.get('MAX_MEM','').strip()
m = re.fullmatch(r'(\d+)(Mi|Gi)', q)
if not m:
raise SystemExit(f'Cannot parse MAX_MEM='{q}'. Expected like 512Mi or 1Gi.')
val = int(m.group(1))
unit = m.group(2)
# convert to Mi
mi = val if unit == 'Mi' else val * 1024
half_mi = mi // 2
print(f'{half_mi}Mi')
PY
)
echo 'Half of max: $HALF_MEM'
Example: if MAX_MEM=512Mi HALF_MEM=256Mi
Example: if MAX_MEM=1Gi HALF_MEM=512Mi
4) Update the nosql Deployment (DO NOT delete it)
First, get the container name (Deployment may have a custom container name):
kubectl -n haddock get deploy nosql -o jsonpath='{.spec.template.spec.containers[*].name}{'\n'}'
Now set resources (this updates the Deployment in-place):
kubectl -n haddock set resources deploy nosql \
--requests=memory=128Mi \
--limits=memory=$HALF_MEM
5) Ensure the update rolls out successfully
kubectl -n haddock rollout status deploy nosql
6) Verify the pod has the right requests/limits
kubectl -n haddock get deploy nosql -o jsonpath='{.spec.template.spec.containers[0].resources}{'\n'}'
kubectl -n haddock get pods
Pick the new pod and confirm:
kubectl -n haddock describe pod <new-pod-name> | sed -n '/Requests:/,/Limits:/p'
You should see:
Requests: memory 128Mi
Limits: memory <HALF_MEM>
If rollout fails (common cause)
If you accidentally set a limit above the namespace max, pods won't start. Check events:
kubectl -n haddock describe deploy nosql
kubectl -n haddock get events --sort-by=.lastTimestamp | tail -n 20
Unlock All Questions for Linux Foundation CKAD Exam
Full Exam Access, Actual Exam Questions, Validated Answers, Anytime Anywhere, No Download Limits, No Practice Limits
Get All 48 Questions & Answers